Consume Calculator Service

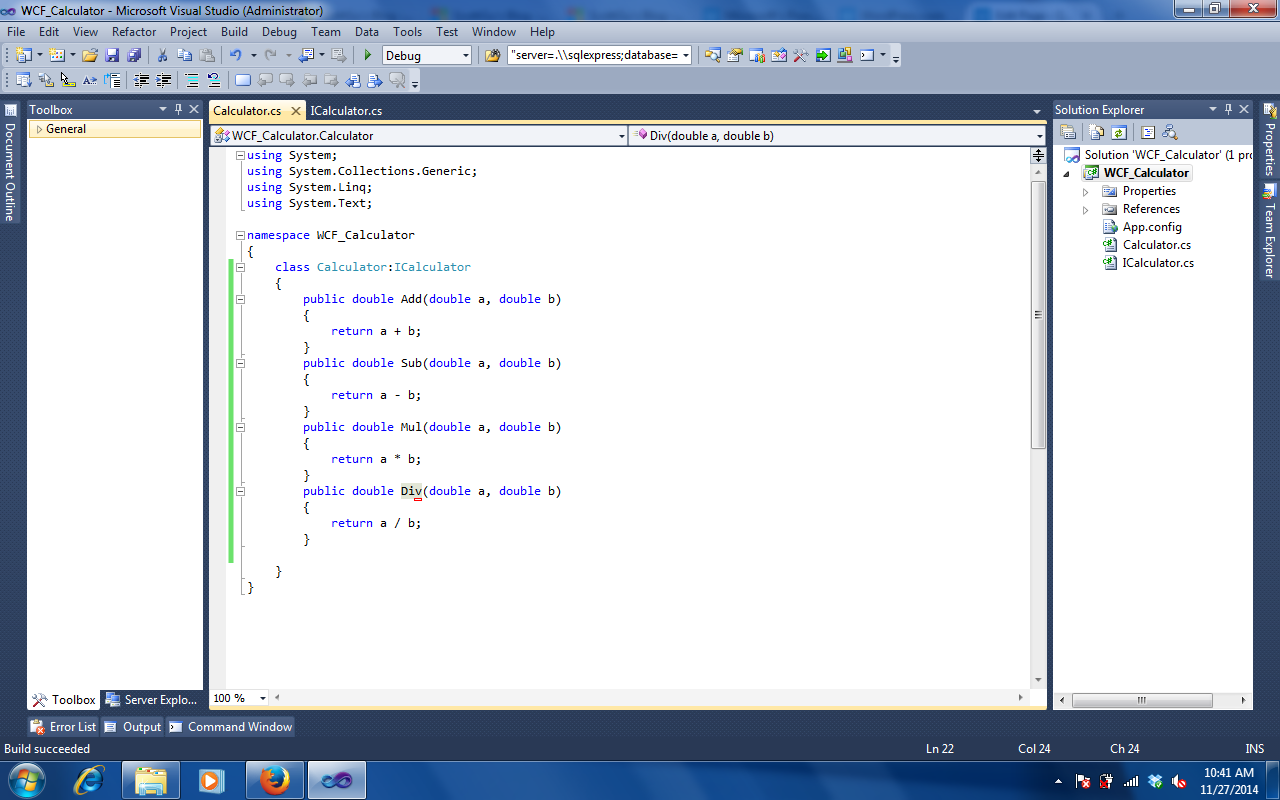
Welcome to the part-2 of WCF…Run your service and copy the address which is available in WCF Test Client which is shown as:
address
Now create a new console Application as shown:
console
Right Click References in Solution and select Add Service Reference which populates a new window with entries as Address where you need to paste the address of your Calculator service which was copied in Very first step then click GO button and give a name to it as shown:
Serviceref Click on OK..Now client console application have a proxy service in it..just create a object of it then access its operation contracts by supplying required parameter values and get the result..sample of such code is shown as: code Just press Clrl+F5 then supply the values..

the final output would be as shown:

output

Thanks…Enjoy…

Now the same Calculator service we now going to consume in windows Application..

1. Create new windows application using C# language and name as Windows_Calculator.

2. Add service reference by right click onĀ  solution and paste the URL of the service in Address bar as we did in console application above in two images and press discover button.

3. create the service_reference object and access their methods and code as shown in below image:

win_code

one thing we need to observe here is that we are not at all writing any logic code here in consuming clients because all logic is written in service and we just pass appropriate input and retrieve the results.The output of the above windows application would be as:

win_output

Hope would be helpful for anyone atleast…

Microsoft’s Powerful Service: WCF Walk through

Hi Everyone!!!
Today we are going to build a new WCF Service named WCF_Calculator in part 1 and in later sessions we consume this service in console application, Windows Application.

To create a new WCF Service, Start your visual studio 2010, Click on New Project–>Window gets populated..Select C# language and WCF from left most pane–>Select WCF Service Library and give name to your service(here I gave name as WCF_Calculator) as shown below:Untitled
Now Click on OK. The solution looks like as:

solution

IService1.cs and Service1.cs are auto-generated files. As we are building Service from scratch hence we delete IService1.cs and Service1.cs files in order to know the behavior of service very well. Select these two files from the solution then right click of mouse and select Delete.
Now add new item by right click solution then add interface named “ICalculator.cs” then code as shown:
Interfaace
We are very to near to pack up..have little patience please….As we have interface ready with us…
Every interface need to be implemented, so now right click your solution and a new item select class name it as “Calculator.cs”. Code the class as shown below:

Calculator
Now the very last step to fly is open App.Config file and change the interface name which was IService1 to ICalculator in endpoint tag Contract value and also change service tag attribute name=Calculator which is our class name which is implementing our interface. Here our App.Config should look as:

Appfile
Now Press F5 and your service is in the air…Microsoft Built in WCF Service Host Tool is available which runs our service shown as:
output1
To the left most pane we find our OperationContracts named Add,Sub,Mul and Div…Click on Add then supply values to arguments which is shown in below image as 234 and 432 and click Invoke Button which displays result as:
output2
similarly click each of the OperationContract and supply values and click Invoke button to retrieve result…
We are done in Creation of the Service…In next part WCF 2 we look at how to consume this Calculator service in Console and Windows Service…Thanks…Enjoy…

Testing Webservice using Visual studio 2010 SoapUI

Assalamualaykum Wr Br…
SoapUI is a powerful tool to interact with webservices,WCF RESTFul and many other services. In our previous post we have implemented Calculator WCF service which we tested using Visual Studio Integrated Tool named WCF TEST Client. Now the same tool yet with high features is SoapUI. The following screen shows how soapUI looks like:
soap
Now click the file from main menu->New Generic Project, the following screen appears:
generic
Specify the Project Name as “Calci” and Initial WSDL/WADL: here paste the base address from the WCF_Calculator service and append “?wsdl” as shown in above image. Then click OK that results a new appearance as shown. Please Note that the WCF service needs to be running.
process
Now specify the inputs to ADD method of WCF service to SoapUI for processing the result in ? and ? replace ? with values as shown in above figure and the click the play button which process the inputs and displays the result in response window adjacent to it.
Thaks alot…Will update you with lot of stuff in upcoming posts till the have a Good Day….

All is well

My Simple App MVC1

Assalamualikum Here we gonna explore first simple app of MVC(Model View Controller).
MVC stands for Model-View-Controller, a design pattern thatā€™s very popular in the web development space. As an alternative to Web Forms, ASP.NET MVCtakes a different approach when it comes to structuring web applications. This means you wonā€™t be dealing with ASPX pages and controls, postbacks or view state, or complicated event lifecycles. Instead, youā€™ll be defining controllers, actions, and views. The underlying ASP.NETplatform is
the same, however, so things like HTTPhandlers and HTTPmodules still apply, and you can mix MVCand Web Forms pages in the same application. Both ASP.NETWeb Forms and ASP.NET MVCsit alongside each other on top of the core ASP.NETplatform.
The modelā€”The domain that your software is built around.
The viewā€”The visual representation of a model, given some context. Itā€™s usually the resulting markup that the framework renders to the browser.
The controllerā€”The coordinator that provides the link between the view and the model. The controller is responsible for processing input, acting upon the model, and deciding on what action should be performed, such as rendering a view or redirecting to another page.
Now lets start our new project named “MY MVC1” and select C# language then select ASP.NET MVC project then a window gets populated select Empty project.
2. Observe that we find additional directories in solution as “Controller,Model,View and Content” which represents our ASP.NET MVC solution. Right Click on Controller then select New Controller and Give name as MYMVC1Cotroller…
3. A New class gets created inside Controller directory with a default method named as “Index” whose return type is ACTIONRESULT which is View.
4. Right click your Action Result method and select to create new view then a new window populates which asks to use razor view engine(CSHTML) or asp c#(ASPX) then select ASPX.So your controller should be like as shown below:
controller1
now lets work with view and should be like as below:
view1
Now when you execute error is encountered because the controller is need to be set which is shown as in the url..
mvc1output
Thats all for the day…We shall continue it at some other time till then good Bye..

SQL Joins in a simple way…

Hi All,
Today we explore the simply quite simple and interesting concept of SQL joins.
Join is a clause which is used to combine rows from two or more tables based on a common field between/among them.
The most common join is INNER JOIN, before we start up, lets create two tables as shown below:
To clear the screen in SQL ORACLE type: cl scr(press Enter).
CREATETABLECOMMAD
Now lets insert some data in these tables as shown below:
INSERT_TABLE
Similarly add some data into orders table as shown:
ORDERS
Now I recapitulate again that we have two tables named “ORDERS” and “CUSTOMERS”. I retrieve the data from two tables but use single from clause thats because of joins. I retrieve OrderId from order table aliases as O, CustomerName from Customers table aliases as C and O.Orderdate as shown:
JOIN
The output which we got was based on the constraint customerid is equal in both tables(CUSTOMERS,ORDERS). When the constraint is satisfied the CUSTOMERS Table fields are populated.
What else would happen if I dont specify Inner in select query which does produces the same output as above shown. We conclude that both INNER JOIN AND JOIN ARE SAME.
If we replace * instead of o.orderid,c.customer and o.orderdate then we get the result set as:
It returns all combination of orders tables rows and customers tables rows based on constraint match.
INNER JOIN: Returns all rows when there is at least one match in BOTH tables.It means in first we got 3 rows as output now we get these 3 rows two times as we joined the two tables.

SQL LEFT JOIN Keyword

The LEFT JOIN keyword returns all rows from the left table (table1), with the matching rows in the right table (table2). The result is NULL in the right side when there is no match.Observe the following screen:
left_join
One thing to note is that left join returns all rows from left table and returns only matched rows from right table.In some databases LEFT JOIN is called LEFT OUTER JOIN.
img_leftjoin
The LEFT JOIN keyword returns all the rows from the left table (Customers), even if there are no matches in the right table (Orders).

SQL RIGHT JOIN Keyword

The RIGHT JOIN keyword returns all rows from the right table (table2), with the matching rows in the left table (table1). The result is NULL in the left side when there is no match.
img_rightjoin
In some databases RIGHT JOIN is called RIGHT OUTER JOIN.

SQL FULL OUTER JOIN Keyword

The FULL OUTER JOIN keyword returns all rows from the left table (table1) and from the right table (table2).
The FULL OUTER JOIN keyword combines the result of both LEFT and RIGHT joins.
img_fulljoin

Sample Crystal Report in VS2010

Hi We explore sample crystal report creation in visual studio 2010 using C# asp.net.We start first from database. I create a sample database by name Department and a table named Clg.In this table i have tuples as ID, Dept_name and HOD with 4 records.We display the entire table data as a report.
1. Now create an empty new web-project with name as Sample_crystal.
2. Add a webform named as webform1.aspx and add crystalreport which populates a wizard select Standard report and blank report then click ok.
3. Drag-drop the dataset1.xsd from toolbox and on which drop clg table from server explorer.
4. Drag-drop the crystalreportviewer on to the webform and in page_load event add the code as::
protected void Page_Load(object sender, EventArgs e)
{
SqlConnection con = new SqlConnection(“Data Source=.\\sqlexpress;Initial Catalog=departmetn;Integrated Security=True;Pooling=False”);
SqlDataAdapter da=new SqlDataAdapter(“select * from clg”,con);
DataSet ds=new DataSet();
da.Fill(ds,”clg”);
CrystalReport1 o = new CrystalReport1();
o.Load(Server.MapPath(“CrystalReport1.rpt”));
o.SetDataSource(ds.Tables[“clg”]);
CrystalReportViewer1.ReportSource=o;
CrystalReportViewer1.DataBind();
}
5. click the field explorer (just as toolbox,server explorer) @ crystalreport.rpt screen select Database fields–>database expert then select our dataset.
6. Expand the database Fields and drag-drop the columns of table on the crystal report Section 3(Details).
Run the application which yields the exact report from database.